Track dynamic conversion values
Overview
Dynamic conversion values enhance your marketing strategy by providing a more accurate measure of metrics such as ROAS (Return on Ad Spend).
Benefits include:
- Gain better insights into the value generated by Taboola, such as ROAS.
- Use the insights gained to adjust your campaign strategy.
ROAS (Return on Ad Spend)Dynamic conversion values allow you to track the actual revenue from each conversion, providing accurate ROAS measurement. This is essential because conversions do not have equal value - a $10 purchase is worth less than a $100 purchase.
Which flow?
Tracking dynamic values depends on your overall conversion tracking solution for Taboola:
- If you are using S2S (server to server) conversion tracking, see: The postback URL > Optional params
- If you are using Shopify, see: Set up Shopify conversion tracking (via Realize).
Our Shopify app manages dynamic conversion tracking for you - no special action is required on your side.
- If you are using WooCommerce, see: Set up conversion tracking in WooCommerce.
Our WooCommerce plugin manages dynamic conversion tracking for you - no special action is required on your side.
- For most other cases, continue below.
Track dynamic values with Taboola pixel
To track dynamic values via Taboola pixel, edit a conversion rule in Realize (or create a new one), and add dynamic params. Detailed steps are provided below.
Before you startIf you have not yet done so, install the Taboola pixel.
How dynamic values workDynamic values are sent via the pixel as additional parameters (like
revenue,currency,quantity,orderid). These parameters use variables from your website that are inserted at runtime, replacing placeholder values in the code snippet. This allows each conversion to include its actual value rather than a fixed amount.
Fixed values vs dynamic valuesThe instructions below explain how to add dynamic values to your conversions. You can follow similar steps to add fixed values. (Simply replace the placeholder value with a fixed value.)
Realize setup
Edit an existing conversion
If you already created a conversion in Realize, open it and adjust the dynamic parameters:
-
Open Realize, and select the account (top, left) that you will use to track conversions.
-
In the sidebar (left), select
Tracking. -
Click on the
Editicon for the relevant event-based conversion rule:
-
Scroll down to the
Event Codesection. -
Select the relevant
dynamic parameters. Ideally, send at leastValue(revenue),Currency, andQuantity.Order IDis relevant for some events (e.g., purchase events).Selecting a parameter inserts it into the code snippet with a placeholder value (see screenshot below).
Your webmaster will need to ensure that an actual value is inserted dynamically (at run time):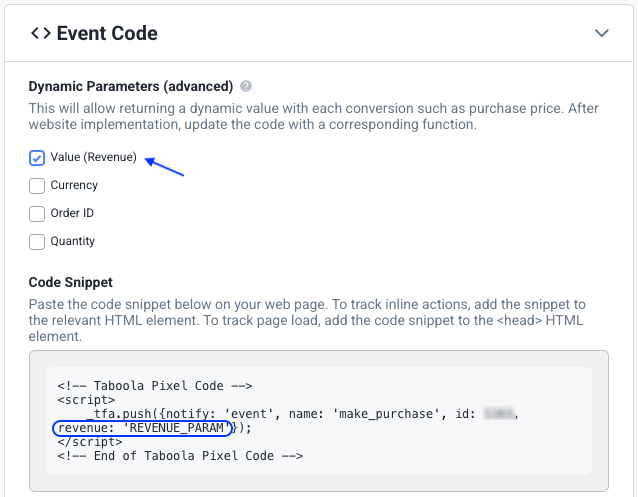
-
Once you have inserted the relevant params, mouse over the code snippet and click on
COPY TO CLIPBOARD. -
Review your chosen settings, and click on
Save(bottom, right):
-
Forward the code snippet (that you copied above) to your webmaster to implement on the relevant page(s).
A common pitfallCopying and pasting code into Microsoft Word or Google Docs may result in non-standard quotation marks that break your code. Always make sure to copy your code snippets into a text editor only.
To send an email with all your code snippets, see: Tips & techniques (below)
Next, your webmaster will need to implement the pixel in your web pages.
Create an event-based conversion
If you have not yet created a conversion in Realize, create it now:
The instructions below illustrate the steps for setting up a purchase event.
For additional guidelines, see the Help Center.
-
Open Realize, and select the account (top, left) that you will use to track conversions.
-
In the sidebar (left), select
Tracking. -
Click on
+ New Conversion(far right).Select
Create conversions using codeand clickContinue. -
Type in a
Conversion Nameof your choice - e.g.Purchase.This is a descriptive name for your convenience.
-
For
Conversion Type, selectEVENT:
-
Leave the
Fixed Valuefield blank.For additional guidelines, see the Help Center.
-
Select the relevant
Category- e.g.Make Purchase.Note that the default
Event Nameismake_purchase. The identical name will need to appear in your script. -
(Optional) If desired, edit the following fields:
Click Through Conversion WindowView Through Conversion Window
-
Leave the
Include in total conversionscheckbox checked.Tip: Always include the most important conversions, so that the Taboola algorithm will optimize towards them. For additional guidelines, see the Help Center.
-
(Optional) If you want to measure ROAS for this conversion in default columns, leave the
Include in total valuecheckbox checked. Otherwise, you can uncheck it. -
(Optional) If desired, edit the following fields:
Audience PropertiesAggregation Type
-
Under the
Event Codesection:- Select 1 or more
dynamic parameters. Ideally, send at leastValue(revenue),Currency, andQuantity.Order IDis relevant for some events (e.g., purchase events).Each parameter that you select is inserted into the code snippet with a placeholder value.
Your webmaster will need to ensure that an actual value is inserted dynamically (at run time):
- Mouse over the code snippet and click on
COPY TO CLIPBOARD.
- Select 1 or more
-
Review your chosen settings, and click on
Create(bottom, right):
- Forward the code snippet (that you copied above) to your webmaster to implement on the relevant page(s).
A common pitfallCopying and pasting code into Microsoft Word or Google Docs may result in non-standard quotation marks that break your code. Always make sure to copy your code snippets into a text editor only.
To send an email with all your code snippets, see: Tips & techniques
Next, your webmaster will need to implement the pixel in your web pages.
Your web pages
Choose an approach that matches how you manage your Taboola pixel:
Edit the page manually
If you are managing your Taboola pixel directly on your website (not using GTM), follow these steps to implement dynamic values manually.
For more detail about manual implementation, see: Add the base pixel manually.
Using the above code snippet, your webmaster will need to:
- Edit the snippet and replace each placeholder value with an appropriate macro or variable - or use custom development to ensure that a dynamic value is inserted.
- Fire the code snippet for each relevant event - e.g. when the user makes a purchase.
The exact steps will depend on the platform you used to integrate Taboola pixel, and/or the platform you used to build your website.
<script>
    const purchaseValue = '<?php echo json_encode($order_total); ?>';
</script>

<!-- Taboola Pixel Code -->
<script>
    _tfa.push({
        notify: 'event',
        name: 'make_purchase',
        id: 1234,
        revenue: purchaseValue
    });
</script>
<!-- End of Taboola Pixel Code -->The above example is provided for illustration only.
Google Tag Manager
If you are using Google Tag Manager (GTM) to manage your Taboola pixel, you can pass dynamic values using GTM variables. Choose the approach that matches your GTM setup.
Flow I: Using the GTM Template
For more detail about using the GTM Template, see: Add event pixels in GTM.
- In your GTM dashboard, open the Taboola Pixel tag you created for your event.
- Scroll down to the
Custom Parameterssection. - Check the
revenuecheckbox:- In the field that appears, enter a GTM variable using double curly braces
{{Variable Name}}(e.g.,{{Purchase Value}}or{{Data Layer Variable - transactionTotal}}) - You can type the variable name with double curly braces, or use the variable picker dropdown (🔽 icon) to select it
- The value must be numerical (integer or decimal) without commas
- In the field that appears, enter a GTM variable using double curly braces
- Check the
currencycheckbox:- In the field that appears, enter a GTM variable using double curly braces
{{Variable Name}}(e.g.,{{Currency Code}}or{{Data Layer Variable - currencyCode}}) - You can type the variable name with double curly braces, or use the variable picker dropdown (🔽 icon) to select it
- The value must be a three-letter currency code (e.g.,
USD,EUR,GBP)
- In the field that appears, enter a GTM variable using double curly braces
- (Optional) To pass additional parameters like
quantityororderid:- Check the
Other parameterscheckbox - In the table that appears, add rows for each parameter:
- Name: Enter the parameter name (e.g.,
quantity,orderid) - Value: Enter a GTM variable using double curly braces
{{Variable Name}}(e.g.,{{Quantity}}or{{Data Layer Variable - quantity}})
- Name: Enter the parameter name (e.g.,
- Check the
- Click
Save(top, right). - Publish your changes in GTM.
Examples:
The following examples illustrate some values that you might enter in the GTM template.
Under Custom Parameters:
revenue:{{Purchase Value}}or{{Data Layer Variable - transactionTotal}}- A GTM variable containing the purchase amountcurrency:{{Currency Code}}or{{Data Layer Variable - currencyCode}}- A GTM variable containing the currency code
Under Other parameters:
quantity:{{Quantity}}or{{Data Layer Variable - quantity}}- A GTM variable containing the quantity valueorderid:{{Order ID}}or{{Data Layer Variable - transactionId}}- A GTM variable containing the order/transaction ID
GTM Variable SyntaxThe
{{Data Layer Variable - keyName}}format tells GTM to read a value from your website's data layer. ReplacekeyNamewith the actual key name used in your data layer (e.g.,quantity,transactionId,orderId, etc.).
Flow II: Using Custom HTML
For more detail about using Custom HTML, see: Add event pixels in GTM using Custom HTML.
- In your GTM dashboard, open the Custom HTML tag you created for your event.
- In the
HTMLfield, modify the code snippet to include dynamic parameters. - Replace placeholder values with GTM variables using double curly braces
{{Variable Name}}. GTM will replace these variables with their actual values when the tag fires. - Click
Save(top, right). - Publish your changes in GTM.
Example:
The following code snippet shows how to include GTM variables (using double curly braces) in your Custom HTML tag:
<script>
  _tfa.push({
    notify: 'event',
    name: 'make_purchase',
    id: {{Taboola Account ID}},
    revenue: {{Purchase Value}},
    currency: '{{Currency Code}}',
    quantity: {{Data Layer Variable - quantity}},
    orderid: '{{Data Layer Variable - transactionId}}'
  });
</script>
Params
You can set dynamic values using the following params:
revenue
revenuePopulate revenue with an integer or decimal value, without commas.
currency
currencyIf your website supports multiple currencies, use the currency param to specify the currency for that conversion.
- Supported currencies:
ILS, GBP, USD, BRL, EUR, INR, JPY, KRW, CNY, RUB, AUD, CAD, HKD, MXN, NZD, SGD, THB, TRY, ZAR.
Default currencyIf you do not receive a
currencyparam, the system uses the default currency settings of your account. If the currency for a given conversion differs from your account default, make sure to pass an appropriatecurrencyparam.
orderid
orderidAssign a value to the orderid field to track the Order ID (the CRM ID assigned to your order).
quantity
quantityIndicates the item’s quantity in the order.
Updated 6 months ago