AppsFlyer - Direct to app
Learn how to integrate AppsFlyer with Taboola for direct-to-app conversion tracking. This guide covers setting up the Taboola partner integration, configuring attribution links, and tracking both install and in-app events.
This flow is simpler than Web to App.
For more information, see: S2S Conversion Tracking With AppsFlyer.
Your version of AppsFlyer might differ from the one described here.
For AppsFlyer support, visit the AppsFlyer Help Center.
Integrate AppsFlyer with Taboola
Configure the Taboola Partner Integration
-
Log into your AppsFlyer dashboard.
-
Under
My Apps, start typing the relevant App ID and click on the thumbnail to open the App. -
Under
Collaborate(bottom, left), selectActive integration. -
Start typing
"Taboola"and click on the thumbnail to open the Taboola Partner. -
Under
Taboola Integration, toggleActivate Partnerto ON. -
Under
In-app event settings:- Leave the
Taboola Ecomm Campaign IDfield blank. - Fill in your
Taboola Advertiser ID.To track account-level conversions, fill in the relevant Account ID.
To track network-level conversions, fill in the Network ID.
- Leave the
-
Click
Save Integration(bottom, right). -
Switch to the
Attribution Linktab. -
Under
Choose your attribution link type, chooseUse single platform linkorUse Onelink, depending on your use case.For more detail, refer to the AppsFlyer documentation.
-
Under
Attribution link parameters, map each AppsFlyerParameter nameto its correspondingvalue(Taboola param).For more detail about AppsFlyer params, refer to the AppsFlyer documentation:
For more detail about Taboola params, see: Creating and Adding URL Parameters for Tracking -
Skip the
Retargeting settingssection. -
Under
Click-through attribution, set theClick-through lookback windowto the desired duration - e.g. 30 days (Taboola default). -
Under
View-through attribution, set theView-through lookback windowto the desired duration - e.g. 24 hours (Taboola default). -
Click
Save Integration(bottom, right).
Best PracticeConfigure AppsFlyer and Taboola with the same lookback window.
If AppsFlyer has a shorter lookback window, then any conversions outside that window will not be passed to Taboola for attribution.
The Taboola lookback window will be configured below under Set up corresponding events in Taboola. By default, the Taboola lookback window is 30 days.
(Optional) Track in-app events
In-App Event TrackingIn-App Event Tracking allows for more granular campaign optimization.
- If you followed the previous section, you already have the necessary screen open. Else:
- Log into your AppsFlyer dashboard.
- Select the relevant App.
- Select
Collaborate>Active Integrationand click onManage integrationin the Taboola card.
- Toggle
In-app event postbackstoONto track in-app conversions. - Define the desired duration for the postback window (e.g. 30 days).
- Click on
Add Eventand configure the event details:- Select the relevant
AppsFlyer eventand map it to the correspondingpartner event(Taboola event).Refer to the
Trackingsection in Realize for the exact event name. - Under
for user from, select the appropriate option:This Partner Only- for exclusive Taboola eventsAll Media Sources Including Organic- to include all sources
- Under
including, select the appropriate option:No Values & No Revenue- for non-revenue eventsValues & Revenue- for transactions like purchasesValues & No Revenue- for specific non-revenue-related values.
- Select the relevant
- Click
Save Integration(bottom, right).
Best PracticeConfigure AppsFlyer and Taboola with the same lookback window.
If AppsFlyer has a shorter lookback window, then any conversions outside that window will not be passed to Taboola for attribution.
The Taboola lookback window will be configured below under Set up corresponding events in Taboola. By default, the Taboola lookback window is 30 days.
Set up a URL for your ad
Obtain the AppsFlyer Click Attribution Link
- If you followed the previous sections, you already have the necessary screen open. Else:
- Log into your AppsFlyer dashboard.
- Select the relevant App.
- Select
Collaborate>Active Integrationand click onManage integrationin the Taboola card.
- Select the
Attribution linktab, and locate theClick-through attributionsection. - Copy the
Click Attribution Linkcreated for Taboola.
Sample AppsFlyer Link:
https://app.appsflyer.com/com.appsflyer.adNetworkTest?pid=taboola_int_siteid={site_id}&c={campaign_name}_ad_id={campaign_item_id}_click_lookback=7d_installpostback=false&clickid={click_id}
Do not edit the Click ID portion (in red) - it should look exactly as shown.
The PID portion (in orange) tells AppsFlyer to attribute the conversion to Taboola.
How it worksClicking on the above link takes the user to the App Store/Play Store. At the same time, AppsFlyer stores the Click ID. In the event of a conversion, AppsFlyer passes the event details and Click ID back to Taboola.
Edit your ad
Link your ad to the App Store/Play Store (via AppsFlyer):
- Log into Realize.
- Add or edit your ad. Fill in the AppsFlyer Link obtained above as the ad URL, and save.
Useful links
Track in-app events only
To ignore install events, insert the following param: af_installpostback=false.
Sample link:
https://app.appsflyer.com/com.appsflyer.adNetworkTest?pid=taboola_int_siteid={site_id}&c={campaign_name}_ad_id={campaign_item_id}_click_lookback=7d_installpostback=false&clickid={click_id}
Set up corresponding events in Taboola
You will need to set up Realize with the same events as AppsFlyer. That way, when AppsFlyer notifies Taboola of a conversion, Taboola can record the conversion to the matching event and reflect it in reporting.
Create the app install event in Taboola
-
Open Realize, and select the account (top, left) that you will use to track conversions.
Make sure to select the Taboola account that matches the Account ID or Network ID you filled in under the AppsFlyer setup.
-
In the sidebar (left), select
Tracking. -
Click on
+ New Conversion(far right).Select
Create conversions using codeand clickContinue. -
Type in a
Conversion Nameof your choice - e.g.App Install.This is a descriptive name for your convenience.
-
For
Conversion Type, selectEVENT:
-
(Optional) Fill in a
Fixed Value.For additional guidelines, see the Help Center.
-
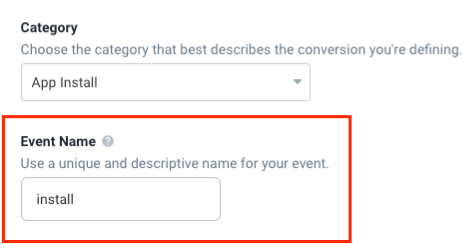
Under
Category, selectApp Install. -
Edit the
Event Nameto readinstall:Make sure to enter the event name in lowercase, exactly as shown.
-
Make sure that the values for
Click Through Conversion WindowandView Through Conversion Windowmatch those in AppsFlyer (see previous section). -
Adjust the values of the remaining fields, as desired.
For additional guidelines, see the Help Center.
-
Review your chosen settings, and click on
Create(bottom, right):

Create in-app events in Taboola (Optional)
First create in-app events in AppsFlyer - see above: (Optional) Track in-app events.
-
Open Realize, and select the account (top, left) that you will use to track conversions.
Make sure to select the Taboola account that matches the Account ID or Network ID you filled in under the AppsFlyer setup.
-
In the sidebar (left), select
Tracking. -
Click on
+ New Conversion(far right).Select
Create conversions using codeand clickContinue. -
Type in a
Conversion Nameof your choice.This is a descriptive name for your convenience. It is not used for the server-to-server communication.
-
For
Conversion Type, selectEVENT: -
(Optional) If relevant, fill in a
Fixed Value.Tip: If the event returns a dynamic value, leave this field blank. For additional guidelines, see the Help Center.
-
Select the relevant
Categoryfor your in-app event. -
Edit the
Event Nameto match the name you provided in AppsFlyer, exactly as it appears there.Use the identical event name, as it appears in AppsFlyer.
Event names are case-sensitive.
-
Make sure that the values for
Click Through Conversion WindowandView Through Conversion Windowmatch those in AppsFlyer (see previous section). -
Adjust the values of the remaining fields, as desired.
For additional guidelines, see the Help Center.
-
Skip the
Event Codesection.(You will post the event values to Taboola via the postback URL.)
-
Review your chosen settings, and click on
Create(bottom, right):
S2S - What's Next?
Start Tracking Conversions
Well done! Your setup is complete, and you are now ready to track conversions.
Test your configuration
We recommend testing your configuration.
Note that you can test your configuration before your campaign goes live.
For more information, see: Verify your S2S conversion tracking
Understanding the end-to-end flow
The following steps illustrate the end-to-end flow:
-
John clicks on your ad. Taboola appends the Click ID value (abc123) and directs John to the target URL:
https://app.appsflyer.com/com.appsflyer.adNetworkTest?pid=taboola_int&c={campaign_name}_siteid={site_id}_ad_id={campaign_item_id}_click_lookback=7d&clickid=abc123 -
AppsFlyer stores the Click ID (abc123) and directs John to the App Store/Play Store.
-
A bit later, John installs and opens the App - which you defined as a conversion in the AppsFlyer dashboard and Realize.
-
AppsFlyer invokes the Taboola postback URL, inserting John's Click ID, and the event name:
https://trc.taboola.com/actions-handler/log/3/s2s-action?click-id=abc123&name=install -
Realize reflects the conversion in the relevant reporting.
What is a Taboola Click ID?When a user clicks on your ad, Taboola's {click_id} macro passes a unique identifier to the destination URL.
Ad link:
https://app.appsflyer.com/...&clickid={click_id}Upon clicking, the user is directed to:
https://app.appsflyer.com/...&clickid=abc123The
abc123identifier is a Click ID. It stores information about the click event - e.g., which campaign was clicked and which user, etc. When AppsFlyer passes back the Click ID, Taboola uses it for attribution and tracking.A real Click ID is an alphanumeric, case-sensitive string. E.g.
USER.CLICK_ID_EXAMPLE
Useful links
Updated 6 months ago