Add event pixels manually
Add event pixels manually to your web pages
Overview
The recommended flow for setting up event pixels is via Google Tag Manager (or our Shopify App, if you are using Shopify).
If Google Tag Manager does not fit your needs, you can use the manual method described below.
This flow requires custom development.
Realize setup
Edit an existing conversion
If you already created a conversion in Realize, open it and copy the relevant code snippet:
- Open Realize, and select the account (top, left) that you will use to track conversions.
- In the sidebar (left), select
Tracking. - Click on the
Editicon for the relevant event-based conversion rule. - Scroll down to the
Event Codesection. Mouse over the code snippet and click onCOPY TO CLIPBOARD. - Keep Realize open and continue with the Web page setup below.
Create an event-based conversion
If you have not yet created a conversion in Realize, create it now, and copy the relevant code snippet:
The instructions below illustrate the steps for setting up a registration event.
Other conversions - e.g. a purchase event - require slightly different steps.
For additional guidelines, see the Help Center.
-
Open Realize, and select the account (top, left) that you will use to track conversions.
-
In the sidebar (left), select
Tracking. -
Click on
+ New Conversion(far right).Select
Create conversions using codeand clickContinue. -
Type in a
Conversion Nameof your choice - e.g.Complete Registration.This is a descriptive name for your convenience. It need not match any value in GTM.
-
For
Conversion Type, selectEVENT:
-
If relevant, fill in a
Fixed Value.Tip: If the event includes a dynamic value - e.g. a purchase event - leave this field blank. For additional guidelines, see the Help Center.
-
Select the relevant
Category- e.g.Complete Registration. -
Confirm that the
Event Nameiscomplete_registration.Your web page must refer to the
Event Name, exactly as entered here.
Otherwise, Taboola will not be able to receive events passed by your web page. -
(Optional) If desired, edit the following fields:
Click Through Conversion WindowView Through Conversion Window
-
(Optional) If relevant, clear the
Include in total conversionscheckbox.Tip: Always include the most important conversions, so that the Taboola algorithm will optimize towards them. For additional guidelines, see the Help Center.
-
(Optional) If relevant, clear the
Include in total valuecheckbox. -
(Optional) If desired, edit the following fields:
Audience PropertiesAggregation Type
-
Under the
Event Codesection:- (Optional) If relevant, select 1 or more
dynamic parameters.Note how the code snippet updates accordingly.
For detailed guidelines, see: Track dynamic conversion values - Mouse over the code snippet and click on
COPY TO CLIPBOARD.
- (Optional) If relevant, select 1 or more
-
Review your chosen settings, and click on
Create(bottom, right):
-
Keep Realize open and continue with the Web page setup below.
Web page setup
For each event in your conversion funnel, fire the relevant event pixel:
<script>
    _tfa.push({
        notify: 'event',
        name: '<event_name>',
        id: <account_id>
    });
</script>
Params
- Replace
<event_name>with theEvent Name, exactly as it appears in Realize.- Replace
<account_id>with your numeric Taboola Account ID.To copy a prefilled code snippet from Realize, refer to the Realize setup section (above).
For additional tips and techniques, see below.
What's next?
Well done! You have added an event pixel!
Next, you should verify that everything is running smoothly.
Tips & techniques
Send an email with prefilled code snippets
To send an email with prefilled code snippets for all your conversions in Realize:
-
Open Realize, and select the account (top, left) that you will use to track conversions.
-
In the sidebar (left), select
Tracking. -
Click on
Account Tracking Setup(top, right):
-
Select
Manuallyas theSetup Method, and click onContinue. -
Scroll down to the
Email instructionssection. -
Click on the
Select Email Addressbutton. -
Fill in the relevant email address and click
SEND. -
Once you are done, click
CLOSE.
Obtain your Account ID
To obtain your numeric Taboola Account ID:
-
Open Realize, and select the account (top, left) that you are using to track conversions.
Make sure to select the Taboola account that you are using to track conversions.
Network Pixel:
For network-level conversions, you must create conversions under your Network Account in Realize (top, left).
Note that all sub-accounts in your network can use the conversion rules and audiences created at the network level.
Learn more: Network-level conversions
-
In the sidebar (left), select
Tracking. -
Copy the numeric
Account IDon the screen (top, left):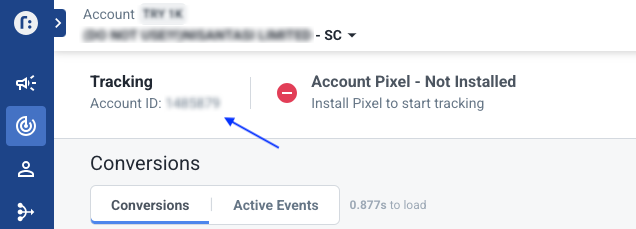
Updated 7 months ago