Track CRM-based conversions using S2S
Overview
This topic describes how to track CRM-based conversions using server-to-server (S2S) integration.
CRM-based conversions occur offline - outside the browser - and cannot be tracked using the Taboola Pixel. Examples include phone orders, in-person appointments, and bookings that occur after initial lead capture.
With S2S integration, your CRM sends conversion data directly to Taboola, allowing you to attribute offline conversions to your ads.
Intended audienceThis flow requires some technical knowledge, as well as access to your CRM system.
Custom development is required to pass events from your CRM to Taboola.
How it works
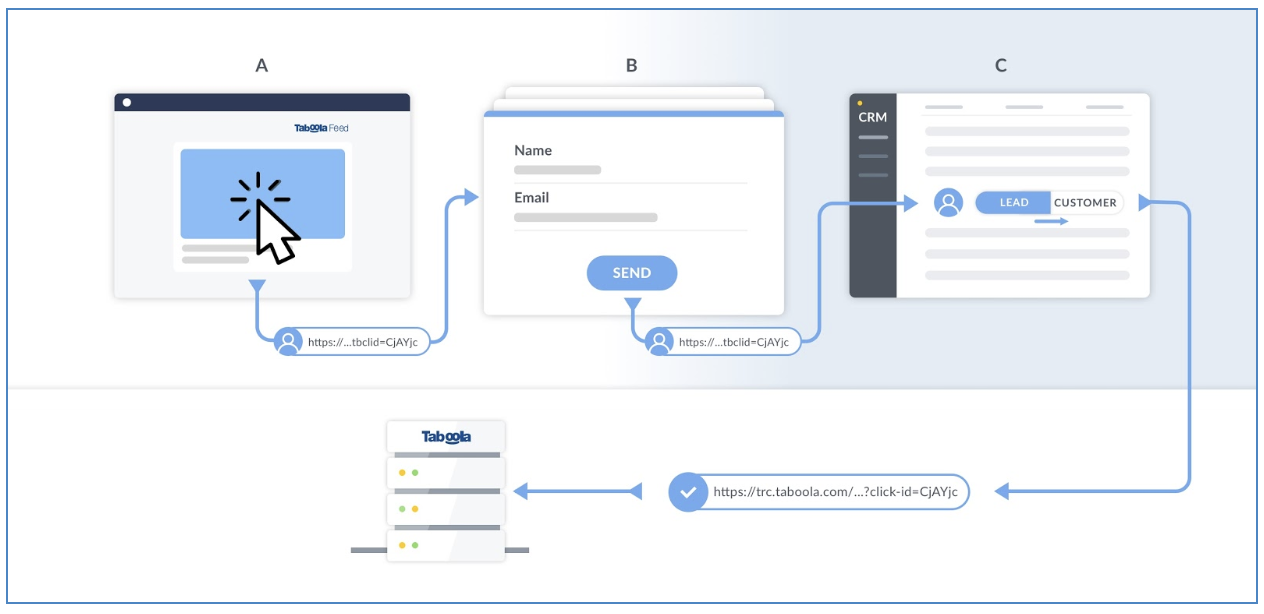
- User clicks your ad (A) - The Click ID is automatically appended to the landing page URL as
tblci={click_id}. - User submits a form (B) - Your website captures the Click ID and sends it with the lead data to your CRM.
- Lead progresses in CRM (C) - Your CRM stores the Click ID with the lead record.
- Conversion occurs - When the lead converts (e.g., completes a purchase), your CRM sends an HTTP request to Taboola with the stored Click ID, attributing the conversion to the original ad.
The Click IDWhen your ad displays, the Click ID macro generates an actual Click ID value.
This is a case-sensitive string of variable length (approx 70 characters). It looks something like this:
{user.click_id_example}Make sure to pass the string 'as is'. A truncated (or otherwise corrupted) value will be ignored.
Default Click ID param (tblci)Taboola automatically appends the following to all ad URLs:
tblci={click_id}If your CRM can accept this param, you are good to go. Otherwise, you will need to add a custom param (see below).
Setup overview
The setup process involves 3 main steps:
- Complete the Realize setup (create an event-based conversion rule, and optionally customize the Click ID parameter).
- Configure your CRM to send conversion events to Taboola.
- Capture and store the Click ID on your website.
Realize setup
To set up S2S tracking in Realize, follow the instructions in Manual S2S integration.
Refer to the following 2 sections:
- Create an event-based conversion rule
Use a conversion name and event name appropriate for your CRM events (e.g.,
Appointment Scheduled,appointment_scheduled). - Add a custom Click ID param (optional)
Only required if your CRM cannot accept the default
tblciparameter.
Once you have completed the Realize setup, return here to configure your CRM.
CRM setup
Create a Click ID field
At the lead level in your CRM, create a new field to store the Click ID:
- Field name:
tblci(or your custom parameter name if you configured one in the previous section) - Field type: Alphanumeric (allow for 250 characters)
- Purpose: Associates the lead with their ad interaction
The field name must match the parameter name from your ad URLs. Use
tblci(the default), or your custom parameter name if you configured one.
Create a conversion trigger
Configure your CRM to send an HTTP request to Taboola when a conversion occurs. For example, when a sales person schedules an appointment with a lead.
Endpoint:
https://trc.taboola.com/actions-handler/log/3/s2s-action?click-id=CLICK_ID&name=EVENT_NAMEExample:
https://trc.taboola.com/actions-handler/log/3/s2s-action?click-id=USER.CLICK_ID_EXAMPLE&name=appointment_scheduled
Multiple eventsYou can track multiple conversion events. Create a distinct event-based conversion rule in Realize for each event you want to measure.
Bulk submissionFor high-volume scenarios, use the bulk submission API endpoint instead of individual postback requests.
For details, see Bulk submit conversions.
Capture the Click ID on your website
Your website must capture the Click ID from the URL and pass it to your CRM:
- Extract the Click ID parameter value (
tblciby default, or your custom parameter name) from the URL. - Store the value in a cookie, local storage, or similar storage method.
- When a user completes an action (e.g., submits a lead form), extract the Click ID from storage and send it to your CRM along with the lead details.
This can be done using a hidden form field or any suitable method for your system.
- Your CRM stores the Click ID in the field you created earlier.
Verification
Once your setup is complete, verify that conversion events are being tracked correctly.
Related topics
Updated 3 months ago