Google Tag Manager
DCO Pixel > Set up with Google Tag Manager
This section refers to the Taboola DCO solution. For the standard e-commerce solution, see here.
The Google Tag Manager (GTM) is a tool that allows you to add and update tags and code snippets, such as conversion tracking and site analytics, without editing your website's code.
What is a tag?
A tag is a piece of code provided by marketing or analytics platforms to send information to them (e.g., Taboola Pixel, Facebook Pixel, Google Analytics Tracking Code, Remarketing Tags, etc.).
What is the E-commerce Taboola pixel template?
E-commerce Taboola pixel template?The E-commerce Taboola pixel template (for Google Tag Manager) allows marketers to easily implement the DCO pixel without the need to know how to code.
Video instructionsPrefer to watch a video? Check out our step-by-step video guide for GTM setup.
Add the Taboola tag
In your GTM workspace:
-
In the navigation panel (left), select
Templates: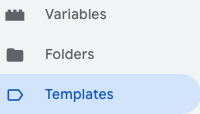
-
In the
Tag Templatessection, click onSearch Gallery. -
Search for and select the
E-commerce Taboola pixeltemplate.For DCO, make sure to select the above template (and not the
Taboola Pixeltemplate). -
Click
Add to workspaceand confirm by clickingAdd.
Configure the tag
In your GTM workspace:
-
In the navigation panel (left), select
Tags: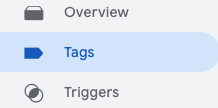
-
Click on
New(top, right). -
In the
Tag Configurationpanel, select theTaboola E-commerce Events Tracking Pixeltemplate that you added. -
Enter your
Account ID(also called Advertiser ID). This is provided by your Taboola account manager.ImportantReplace all fields with your Advertiser ID supplied by your DCO Account Manager. This is NOT the same as your DCO Seat ID.
-
From the
Event Namedropdown, select the event you want to track. The available events and their use cases for your specific industry are detailed in the Tracking events section below. -
Under
Event Parameters, provide the required parameters for the selected event. -
Under
Triggering, select the trigger that corresponds to the user action you want to track (e.g., a user viewing a product page). -
Click
Save.
Event parameters
The following tables show the GTM variables you need to configure for each event. When setting up an event in GTM, select the appropriate GTM variable that returns the required data from your website's data layer.
Data layer optionsIf your site uses Google Analytics 4 (GA4) or Universal Analytics data layer structure, many of these fields may be automatically populated when you enable the corresponding checkbox in the tag configuration. For sites without these data layers, you'll need to manually configure each parameter.
E-commerce terminologyDue to technical requirements, the pixel uses e-commerce terminology (e.g.,
productIds,cartDetails) across all verticals. See your industry tab below for how to interpret these fields.
Select your industry to see the relevant GTM event configuration:
Event | Description | Parameters |
|---|---|---|
Product View (Mandatory) | The user viewed the info page of an item. | Product IDs (Mandatory)
|
Purchase (Mandatory) | A purchase was made. | Cart Details (Mandatory)
Order ID (Mandatory) Value (Mandatory) Currency (Mandatory) |
Add to Cart (Mandatory) | A product was added to the shopping cart. | Product IDs (Mandatory) |
Search (Optional) | A search results page was displayed to the user. Send the first 5 product IDs of the search result. | Product IDs (Optional) Search Term (Optional) |
Category View (Optional) | A list of products was displayed to the user by browsing a category. Send the first 5 product IDs. | Product IDs (Optional) Category (Optional) Category ID (Optional) |
Home Page Visit (Optional) | The home page was displayed to the user. | No additional parameters required. |
Checkout (Optional) | A checkout flow was started. | Product IDs (Optional) |
Add to Wishlist (Optional) | A product was added to a wish list. | Product IDs (Optional) |
Remove from Wishlist (Optional) | A product was removed from the wish list. | Product IDs (Optional) |
Job PlatformsJob Platforms use the JavaScript API only and do NOT support GTM configuration. See the JavaScript API setup for Job Platforms implementation.
Publish your changes
After creating and verifying the tags, the changes must be submitted and then published to apply them to the live environment:
- Click
Submitin your GTM workspace. - Click
Publish. - Verify that your changes are live.
What's next?
After publishing your GTM configuration, validate that your pixel is firing correctly.
Updated about 15 hours ago